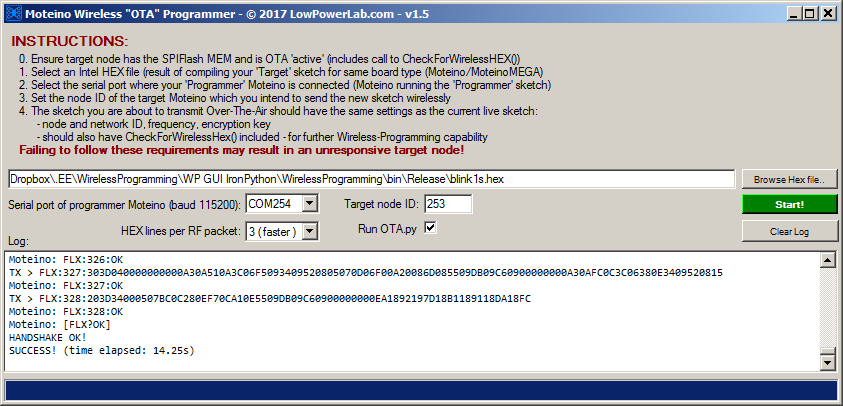
OTA (Over The Air) programmingThis is one very usefull feature when you have a system of nodes (sensors, switches,..), where you need to change some part of one nodes program, let's say, you found, you have higher temperature reading than it should be showing, or you want to change the period, with which you send readings back to gateway. You normally had only one option. Get to that node, connect it to laptop and upload new program to it. Or take that node and bring it to your desktop PC and do the upload. This days, so many wireless devices exist, which brought us OTA. What that is, is a new way of reprograming you device, most of the time, device not being even close to PC. You use the same wireless link that you use to retrieve data from node and send data to it, if it is a switch, to upload whole new program to it. For that, in case of Moteino, you need to have external FLASH memory, where, once you start sending/uploading new program, is stored. After program is sent over (and here we are talking about sending over .HEX file, the same file that you would send over with USB to serial converter, from FTDI or something like CP2102), Moteino reboots, reads content of external flash and stores it into itself, then reboots. And that's it, you have then new code already running. Here is the authours video, which shows how this looks like. But this is not how you would do it today, since there is standalone program, which allows you not to use cmd/terminal. Program looks like this
The settings you have are, you select the HEX file you want to upload to targer from programmer. Target and programmer are moteinos itself, nothing special, just their name for this example. Target is also your node, which you want to change. You select com port of programming moteino, this is as in picture COM254. Target in this case is node with ID 253, this will be different for you (depends on what you set in your sketch). I add two sketches that I used to test. You will need to change your sketches to add OTA function to your sketch. You will need to have flash on your moteino, DualOptiboot not what comes with Arduinos and you will need to change this line: CheckForWirelessHEX(radio, flash, false) to CheckForWirelessHEX(radio, flash, true). If you don't need OTA, then you don't need different DualOptiboot and the one that come with Arduinos will be fine With time you will understand what does what and you'll be able to send OTA your new programs to remote nodes. Arduino IDE sketch for programmer OTA visits: |
|
Application Note on bridging audio amplifiers
A discussion on bridging audio amplifier circuits like LM3886. Includes a schematic to drive a matched pair of amplifiers in a bridged configuration, power supply considerations for LM3886 and TDA1514 power amplifier circuits-especially in bridged pairs. |
Application Note on parallel-bridging LM3886 audio amplifiers
How to make it loud - real loud. (230 watts rms into 8 ohms without clipping from 4 ICs. How to match LM3886s for parallel operation, then bridge the matched parallel banks. If you are not familiar with bridging amplifiers (BTL configuration), read the Application Note on bridging listed left in article Application Note on bridging audio amplifiers. |
| My first car audio system My second car audio system My third car audio system |